
TL;DR:
- Bloom releases trapped CO2 to ensure even saturation and optimal flavor extraction.
- Proper blooming reduces acidity and increases sweetness, complexity, and balance in coffee.
- Adjust bloom time based on freshness, grind size, and coffee origin for best results.
Most home baristas treat the bloom as a optional pre-wet step, something you do because a YouTube video told you to. But skipping or rushing this moment is one of the most common reasons your pour-over tastes sour, flat, or sharply acidic, even when your beans and ratio are perfect. The bloom is not decoration. It is the foundation for everything that follows in your brew. Once you understand what is actually happening in that thirty to forty-five seconds, you will never rush past it again.
Table of Contents
- What is coffee blooming?
- Why does blooming affect flavor and extraction?
- Mastering the bloom: Tools, timing, and technique
- Expert debates: Stirring, swirling, and what home brewers should know
- Why true coffee blooming mastery is about adaptation, not rigid rules
- Explore artisan beans and guides for your perfect bloom
- Frequently asked questions
Key Takeaways
| Point | Details |
|---|---|
| Blooming is key | Proper blooming creates balanced, flavorful coffee with even extraction. |
| Technique matters | Small adjustments in bloom time, grind, or agitation can dramatically affect taste. |
| Freshness changes bloom | Freshly roasted beans produce a more dramatic bloom and may need extra time. |
| Experiment to improve | Taste and tweak your blooming approach for the best results with your equipment and beans. |
What is coffee blooming?
Coffee blooming is the rapid release of carbon dioxide gas from freshly roasted grounds the moment hot water touches them. As the Blooming is the release of gas from coffee grounds when hot water first contacts them, and what you see bubbling up in your dripper is CO2 escaping from inside the bean cells.
During roasting, chemical reactions produce significant amounts of CO2 that become trapped inside the bean’s cellular structure. When you grind those beans and introduce hot water, that gas wants out immediately. The result is a dramatic, frothy expansion of the coffee bed that lasts anywhere from twenty seconds to well over a minute, depending on freshness and grind size.
Here is what you will notice during a healthy bloom:
- Rapid bubbling across the surface of the coffee bed, starting within seconds of your first pour
- Aromatic release that smells far more intense than the dry grounds themselves
- Crust formation as grounds puff upward and bind together
- Crust collapse as the gas escapes and the bed settles back down, signaling the bloom is complete
Fresh coffee blooms with real energy, sometimes almost overflowing a dripper. Old coffee barely produces a bubble or two. That low-activity bloom from stale beans is actually a warning sign that much of the CO2 has already off-gassed during storage, and your extraction is already starting at a disadvantage.
Skipping or rushing the bloom forces water to navigate a bed still full of trapped gas. The water finds the path of least resistance, creating channels through the grounds rather than saturating them evenly. The result? Parts of your coffee bed over-extract while others barely extract at all, producing that sour, sharp, or thin cup you were not expecting.
Blooming matters most in methods where water contact time and saturation are controlled manually, specifically pour-over, Chemex, and French press. For context on how gas release connects to the broader story of coffee extraction science, understanding degassing gives you a much clearer picture of why coffee responds so differently depending on its freshness.
Why does blooming affect flavor and extraction?
Now that you know what blooming looks like, here’s why it matters to both flavor and consistency in every cup.
When CO2 is still trapped inside the grounds, water cannot fully penetrate the cell walls. Think of it like trying to soak a sponge that is full of air bubbles. Water skims the surface instead of soaking through. In coffee, that translates directly into uneven extraction. Some grounds release their acids and sugars too fast (over-extraction), while others never give up their best flavor compounds at all (under-extraction).
A proper bloom clears the way. Once CO2 has escaped, water moves through the grounds evenly, dissolving flavor compounds in a consistent, predictable sequence. You get the brightness first, then sweetness, then body. The cup becomes layered and balanced rather than one-dimensional.
Longer bloom decreases acidity and increases sweetness, viscosity, and complexity, while also slightly lowering total dissolved solids (TDS) and extraction percentage. That sounds technical, but in your cup it means a longer bloom produces a rounder, sweeter, more complex flavor, which is exactly what you want from a well-sourced specialty coffee.
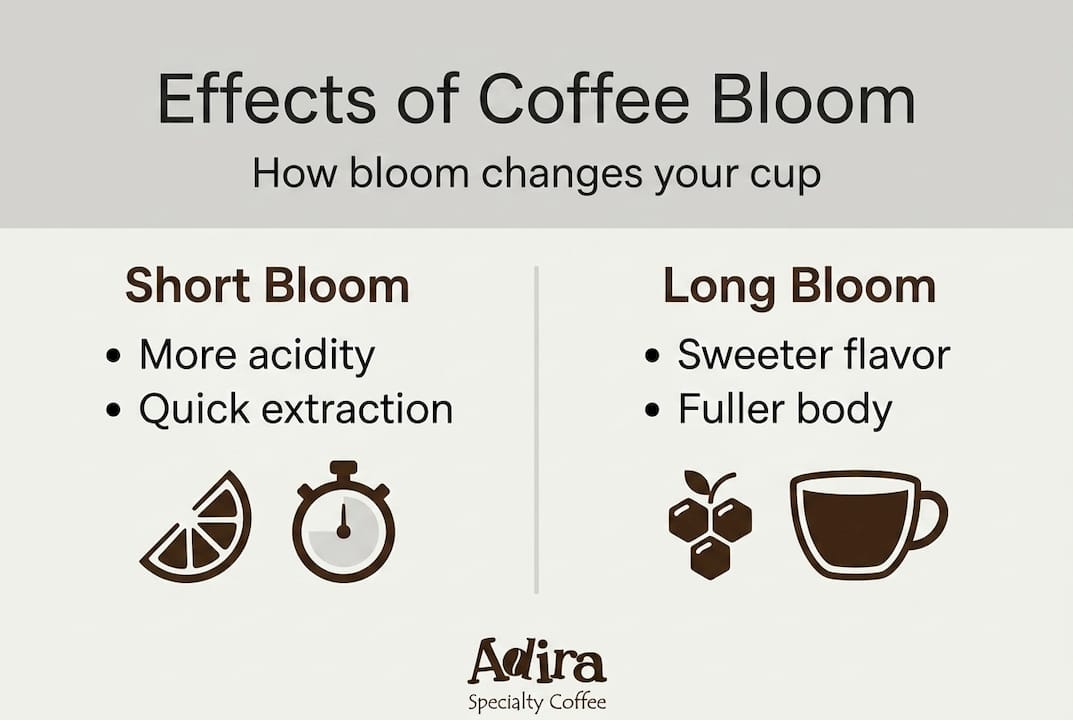
Here is how bloom time affects the key variables in your cup:
| Bloom duration | Acidity | Sweetness | Body/texture | TDS |
|---|---|---|---|---|
| Short (under 20 sec) | High, sharp | Low | Thin, watery | Higher |
| Medium (30 to 45 sec) | Balanced | Moderate | Medium | Balanced |
| Long (45 to 60+ sec) | Low, soft | High | Full, round | Slightly lower |
The sweet spot for most medium to light roast coffees lands around thirty to forty-five seconds. But if you are working with coffee roasted within the last week, that window shifts.
Pro Tip: With very fresh coffee, roasted three to seven days ago, extend your bloom to fifty or even sixty seconds. The aggressive CO2 release from ultra-fresh beans needs more time to fully clear before your main pour begins. Rushing it means your water hits a still-gassing bed, and your cup will taste less balanced than it should. Pairing your timing with expert coffee flavor tips can help you dial in your bloom for specific origins and roast levels.
Mastering the bloom: Tools, timing, and technique
You understand why blooming works. Here is everything you need to do it perfectly in your kitchen, with practical adjustments for common variables.
What you will need:
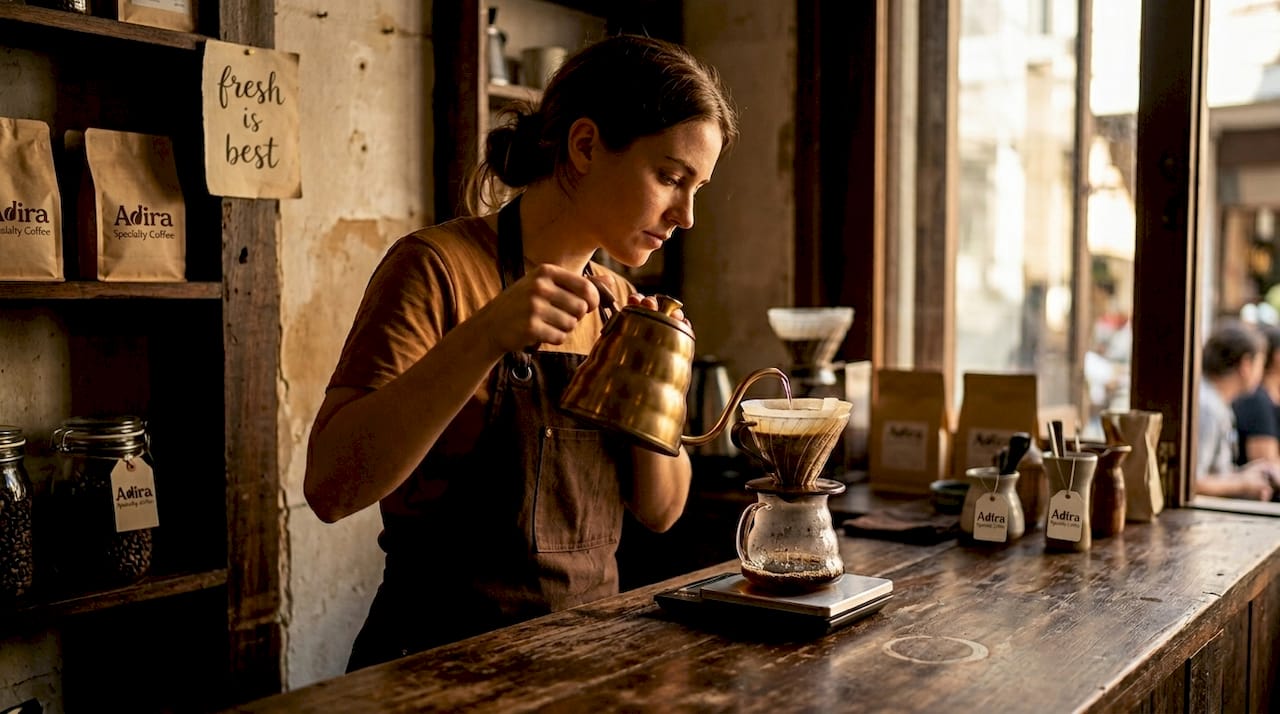
A gooseneck kettle is genuinely important here, not just a nice-to-have. A thin, controlled stream of water lets you saturate all the grounds evenly without blasting through the bed. A digital scale accurate to one gram and a timer round out the essentials.
Step-by-step bloom method:
- Dose and grind fresh. Weigh your coffee (a standard ratio is one gram of coffee per fifteen to seventeen grams of water). Grind just before brewing for maximum CO2 retention.
- Heat water to the right temperature. For light to medium roasts, aim for 200 to 205 degrees Fahrenheit. For darker roasts, 195 to 200 degrees works well to avoid bitterness.
- Pre-wet your filter. Rinse paper filters with hot water to remove papery taste and preheat your dripper. Discard the rinse water.
- Add grounds and level the bed. Tap the dripper gently to create an even, flat surface. This helps water saturate grounds uniformly.
- Start your timer and pour bloom water. Use twice the weight of your coffee in water for the bloom. If you are brewing with 20 grams of coffee, pour 40 grams of water in a slow, steady spiral from the center outward.
- Wait. Let the bloom run its course. Watch for the crust to rise, then settle. For most beans, that takes 30 to 45 seconds. For very fresh or finely ground coffee, wait longer.
- Begin your main pour. Once the bed settles, continue with your remaining water in steady, controlled pours.
Finer grinds trap gas longer, requiring careful saturation; coarser grinds release gas faster and may need a bit more bloom water to fully wet the bed. Very fresh beans with aggressive blooming benefit from an extended bloom window, while an uneven first pour causes dry spots and channeling that no technique further down the recipe can fix.
Pro Tip: After your bloom pour, give the dripper a very gentle swirl or use a spoon to lightly stir the crust. This ensures that any dry pockets hiding under the surface get wet before your main brew begins. Hidden dry clumps are one of the most overlooked causes of sour or uneven cups. You can find additional step-by-step techniques in our coffee brewing guides to match your specific method and equipment.
Expert debates: Stirring, swirling, and what home brewers should know
Once you have mastered the basics, the real fun is learning from the experts. Top baristas do not all agree on what happens after you pour the bloom water, and the debate is worth knowing.
| Approach | Agitation style | Flavor outcome | Best for |
|---|---|---|---|
| James Hoffmann | Gentle swirl | Clarity, clean brightness | Light roasts, floral origins |
| Scott Rao | Vigorous stir | Full saturation, bold body | Medium to dark roasts |
| Matt Perger | Gentle excavation stir | Balance, complexity | All roast levels |
A vigorous stir ensures saturation but risks over-extraction and bitterness if grounds are too fine or bloom water too hot. A gentle swirl or no-stir approach preserves clarity and sweetness but can leave dry pockets if your pour was uneven in the first place.
Here is what that tradeoff looks like in practice:
- Gentle swirl or no agitation: Produces a cleaner, more delicate cup. Works beautifully with choosing coffee beans from floral, light-roast origins like Ethiopia or Colombia
- Vigorous stir: Guarantees saturation and produces a fuller, more intense cup, but requires careful attention to water temperature and grind size to avoid bitterness
- Consistency vs. complexity: Stirring tends to produce more repeatable results; swirling leaves more room for the bean’s natural character to shine through
The smartest move is to pick one approach, brew it consistently for a week, then switch and taste the difference side by side. Your palate will tell you more than any chart. If you want more context on which brewing methods benefit most from each agitation style, exploring our recommendations for best brewing methods will give you a clearer starting point.
Why true coffee blooming mastery is about adaptation, not rigid rules
Most guides tell you to bloom for 30 to 45 seconds, maybe swirl gently, and move on. That advice is not wrong, but it treats blooming as a fixed step in a fixed recipe rather than a dynamic response to your specific beans, grinder, and brewing environment.
Here is what years of working closely with coffee growers and roasters teaches you: the bloom is a conversation between you and the coffee in front of you. A Colombia from 1,800 meters elevation roasted four days ago behaves completely differently from a Sumatra roasted three weeks ago, even if both are brewed on the same dripper with the same ratio.
Conventional wisdom also tends to ignore the role of grind size in bloom behavior. A finer grind traps gas more aggressively and releases it more slowly. If you grind finer to fix a sour cup but keep the same 30-second bloom, you may actually be making the problem worse because the bed is not ready for your main pour yet. The fix is often as simple as extending the bloom by fifteen seconds and tasting again.
If your coffee tastes flat or sharp, try changing only your bloom time and agitation before adjusting anything else. Sometimes it is all you need.
The lesson is not to abandon structure entirely. It is to use your senses as your primary feedback tool. Watch the crust. Smell the aromatics. Taste the first sip before you add sugar or milk. If you consistently taste the results of each adjustment, you will develop intuition that no recipe can give you. That intuition is what separates a competent home brewer from one who genuinely makes exceptional coffee. Understanding how mastering flavor balance connects to every stage of brewing, including the bloom, gives you a fuller picture of where to focus your attention.
Explore artisan beans and guides for your perfect bloom
Knowing the theory is one thing. Experiencing it with genuinely fresh, high-quality coffee is where it all clicks.

At Adira Coffee, our small-batch, freshly roasted beans are sourced directly from around 50 farms across Colombia, Ethiopia, Costa Rica, Guatemala, Brazil, and Sumatra. A bag of our Colombian coffee beans gives you an immediate, real-world experiment in bloom behavior. Colombia’s bright fruit and caramel notes respond beautifully to an extended bloom, and you will taste the difference between a rushed pre-wet and a proper 45-second bloom in your very first sip. Pair your beans with our detailed home brewing guides to build a consistent, repeatable practice that gets better every week. Fresh beans and clear technique are the two things that matter most when you are learning to bloom with intention.
Frequently asked questions
Is blooming coffee necessary for all brewing methods?
Blooming is essential for pour-over, Chemex, and French press but less critical for espresso, which uses pre-infusion instead, achieving a similar degassing effect through low-pressure water contact before the full shot pulls.
How long should I let coffee bloom?
Most recipes suggest 30 to 45 seconds, but finer grinds and very fresh beans may need up to a full minute to fully release their CO2 before the main pour begins.
What if I skip the blooming step?
Skipping the bloom often leads to sour, sharp, or flat-tasting coffee because the trapped CO2 disrupts even water flow through the grounds, causing channeling and uneven extraction.
Why does fresh coffee bloom more aggressively?
Freshly roasted beans contain significantly more trapped CO2 inside their cell walls, so when hot water is added, the gas escapes quickly and visibly, producing a dramatic and energetic bloom.