
You can pour a recognizable heart, tulip, or basic rosetta at home once you control three things: microfoam, the two-phase pour, and how close your pitcher sits to the crema. That’s it. No $6,000 machine required, no barista certification, just steam, milk, and reps.
Do these three things the next time you pull a shot. First, steam your milk until it looks like wet paint, glossy and thick, not bubbly. Second, pour from about 3 to 4 inches above the cup to mix the base and build a canvas. Third, drop the pitcher to roughly half an inch above the surface and speed up your pour to actually draw the pattern.
Your temperature target is 130 to 150°F, or 55 to 65°C. If you don’t have a thermometer, use your hand: when the pitcher goes from warm to genuinely too hot to hold comfortably, stop steaming.
Here’s the first-attempt checklist:
- Steam whole milk to a glossy, wet-paint texture.
- Pour high (3 to 4 inches) until the cup is about 60% full.
- Drop low (0.5 inch) and pick up speed to draw your shape.
- Finish with a small pull-through motion toward the edge of the cup.
Key Takeaways
Reliable home latte art comes down to steaming milk to a glossy wet-paint texture, pouring high to build a base, then dropping low to draw the pattern.
| Point | Details |
|---|---|
| Nail the temperature window | Steam milk to 130 to 150°F, using “too hot to hold” as your tactile backup cue. |
| Master the two-phase pour | Pour high (3 to 4 inches) to mix, then drop to 0.5 inch to draw the pattern. |
| Practice one movement at a time | Spend 10 to 15 minutes repeating a single pour instead of mixing patterns randomly. |
| Fresh crema is non-negotiable | Pour within about 10 seconds of pulling the shot, before crema starts to fade. |
| Start with quality beans | Adira Coffee’s small-batch roasts give home baristas fresher crema to build patterns on. |
Table of Contents
- Essential Equipment for Home Latte Art
- Which Milk Works Best for Latte Art?
- How Do You Steam Milk for Microfoam?
- What Controls the Pour: Height, Angle, and Flow
- Step-by-Step Pours: Heart, Tulip, and Rosetta
- Practice Drills That Build Muscle Memory Fast
- Common Latte Art Problems and Quick Fixes
- Why Bean Quality and Crema Shape Your Canvas
- Coffee Art How To Really Means: Fewer Variables, More Reps
- Get Fresher Beans, Better Crema, Sharper Art
- Frequently Asked Questions
- Sources
Essential Equipment for Home Latte Art
You don’t need a full café setup. You need a short list of tools that actually do the work, plus the discipline to skip the rest for now.
The minimum viable kit looks like this:
- An espresso machine or moka-style setup that produces real crema, since flat coffee gives you nothing to draw on
- A steam wand, or an alternative frothing method if your machine doesn’t have one
- A 12 oz stainless steel pitcher with a pointed spout, which is the sweet spot for single-cup pours
- A wide-lip cup or mug, since narrow cups make pattern work nearly impossible
- A tamper and a decent grinder, because inconsistent grind size ruins crema before you even reach the milk
A thermometer and a small kitchen scale genuinely help while you’re learning temperature cues. A dedicated latte-art pitcher with a razor-thin spout and a milk temperature probe can wait. Those are upgrades for month three, not week one.
Pro Tip: Purge your steam wand with a two-second blast before and after every use. Dried milk inside the tip is the single most common reason home steam wands lose power over time.
For a deeper equipment breakdown, Adira Coffee’s espresso equipment guide covers matching gear to your kitchen setup.
Which Milk Works Best for Latte Art?
Whole dairy milk, at roughly 3.25 to 3.5% fat, is the most forgiving option for beginners. The fat and protein combination stabilizes bubbles and gives you a wider margin for error than skim milk or watery alternatives.
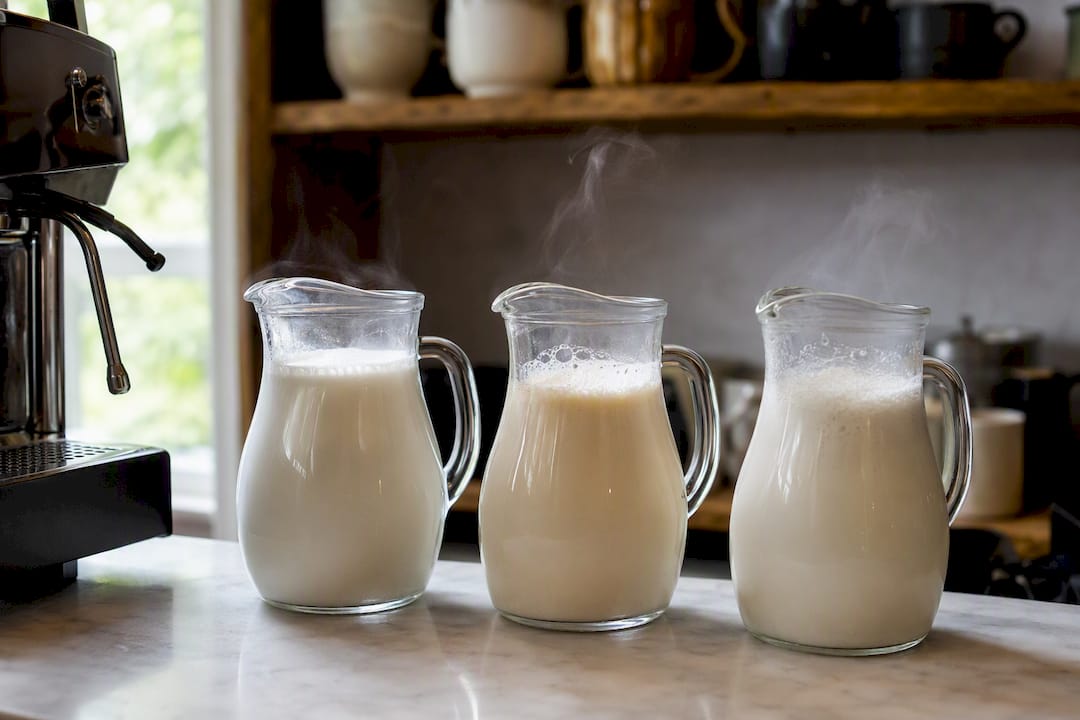
If you’re skipping dairy, reach for a barista-style oat milk. These formulas are engineered with added fat and stabilizers specifically to survive steaming, and they consistently outperform generic plant milks for both texture and pour stability. Regular oat, almond, or soy milk from the regular aisle tends to split or foam unevenly under steam heat.
Fill your pitcher to about one-third full, providing enough volume and headroom for effective steaming. That headroom matters. Too much milk and you kill the vortex; too little and you run out of volume before the foam finishes texturing.
One advanced trick worth knowing: freeze-distilling milk (partially freezing it, then using only the liquid that hasn’t crystallized) concentrates protein and can improve foam stability. It’s an optional experiment for later, not a beginner requirement.
Pro Tip: Let steamed milk rest for 20 to 30 seconds before pouring. This settles large bubbles to the surface, where a light tap and swirl removes them.
How Do You Steam Milk for Microfoam?
Steaming happens in two distinct stages, and confusing them is the number one reason beginner foam turns out either dry and airy or completely flat.
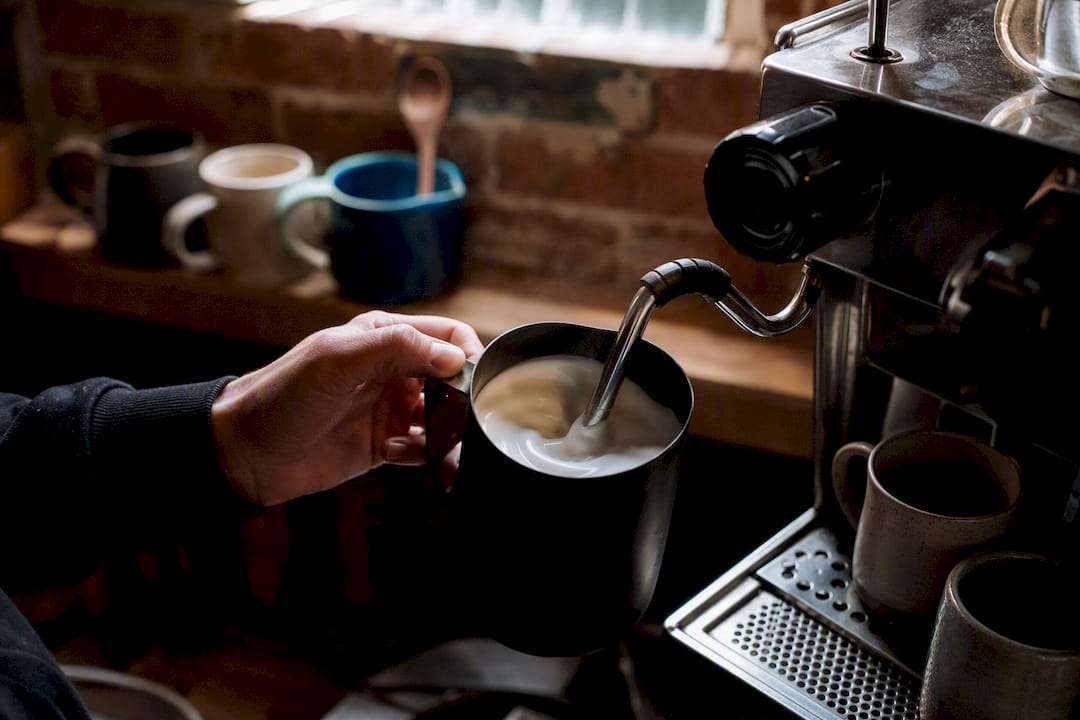
Stage one: stretch. Start with cold milk in a cold pitcher, and purge the wand first. Position the tip just below the surface and let it introduce air for 3 to 6 seconds. You’re listening for a gentle tearing or paper-ripping sound, not a loud shriek. That sound means you’re stretching the milk correctly rather than blasting it with too much air.
Stage two: texture. Submerge the tip slightly deeper and angle the pitcher to create a whirlpool. This vortex is what emulsifies the remaining bubbles into microfoam instead of leaving big pockets of air sitting on top. Keep the spin going until the pitcher hits your target temperature.
Here’s the sequence in order:
- Start with cold milk and a purged wand.
- Place the tip just below the surface, off-center.
- Stretch for 3 to 6 seconds, listening for the tearing sound.
- Lower the tip slightly and tilt to form a steady vortex.
- Keep spinning until the pitcher is too hot to comfortably hold.
- Turn off steam, wipe the wand, and purge again.
- Tap the pitcher on the counter and swirl to pop remaining bubbles.
You’re aiming for milk that looks like glossy wet paint, thick enough to hold a shape but fluid enough to pour in a ribbon.
Three failure patterns show up constantly. Foam that’s too airy or dry usually means you stretched too long or too aggressively. Flat milk with no texture at all means you skipped the stretch phase entirely and went straight to the vortex. Curdled plant milk almost always means the temperature climbed too high, since most non-dairy proteins start breaking down well before dairy does.
Pro Tip: Pitcher shape matters more than most beginners realize. A wider base creates a slower, gentler vortex, while a narrower base spins faster and can over-aerate milk if you’re not careful with wand depth.
What Controls the Pour: Height, Angle, and Flow
Every pattern you’ll ever pour depends on the same physical rule: pour high to sink milk beneath the crema, pour low to let it float on top and draw.
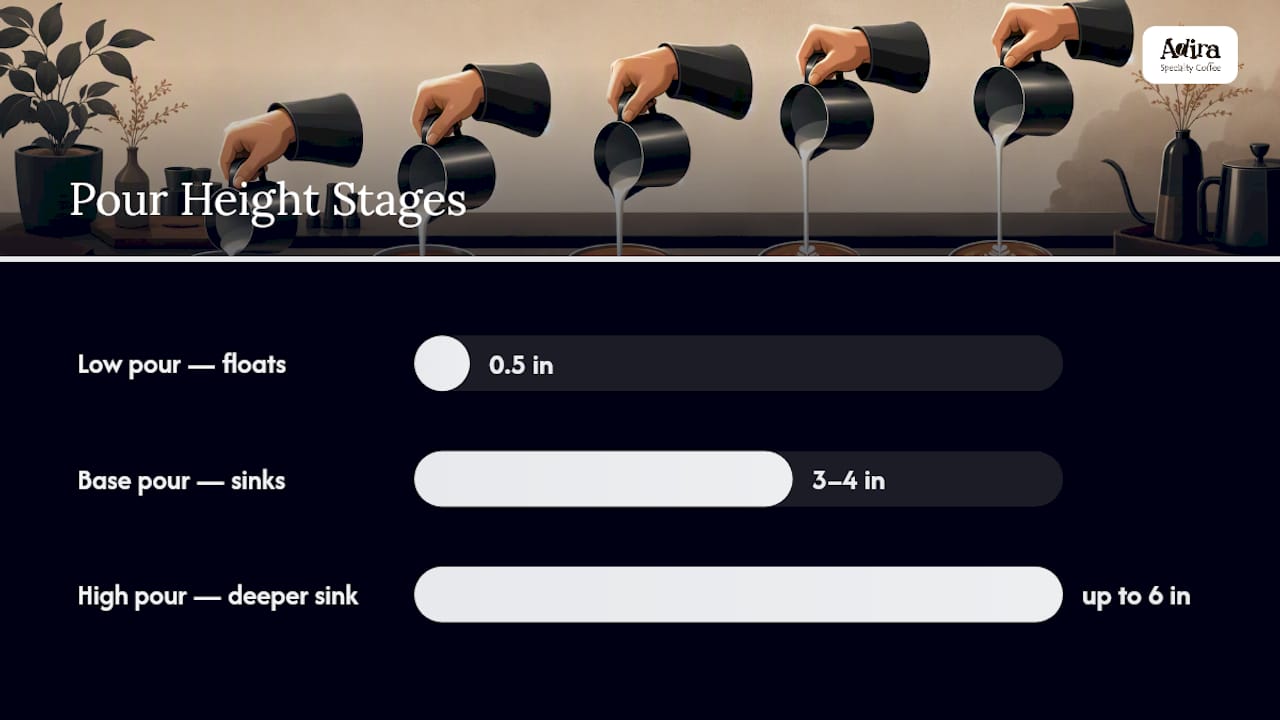
Your base pour starts from 3 to 4 inches above the cup, sometimes up to 6 inches on a full latte. At that height and with a thin stream, the milk punches through the crema and mixes underneath, building a solid white canvas beneath the surface. This is the part beginners rush, and rushing it is why so many home pours end up murky brown instead of clean white-on-brown contrast.
Drop the pitcher to about half an inch above the surface. At that distance, the stream no longer sinks. It rides on top of the crema, and a wider, faster flow is what actually paints the shape.
A few mechanical details make or break this transition:
- Tilt the cup roughly 20 degrees during the early pour so milk has a natural target to fall into.
- Keep the spout centered and close as you lower, rather than swinging it wide.
- Move from your wrist for fine pattern control, and only shift your whole arm for the final pull-through.
- Thin streams build layers; wide streams create bold, fast contrast.
Pro Tip: Record your pours on your phone from the side angle. Watching the height transition frame by frame reveals bad habits, like dropping too early or wiggling with your whole arm, that are nearly impossible to notice in the moment.
Step-by-Step Pours: Heart, Tulip, and Rosetta
Each pattern uses the same two-phase pour with a different move at the end. Learn heart first. It teaches the base and pull-through without the added complexity of wiggling.
Heart
- Base pour high until the cup is about 60% full.
- Drop the pitcher low, near the center of the cup.
- Hold steady and let a white circle bloom on the surface.
- Once the circle fills most of the cup, lift slightly and pull straight through the middle to the edge.
- Cut the flow as you exit.
If you get a shapeless blob instead of a circle, your milk is likely too thick or your pour too slow. If there’s no white shape at all, you poured too high during the art phase.
Tulip
- Pour the base as usual.
- Drop low and push out one small dot, then pause the flow briefly.
- Push a second, slightly larger dot just behind the first, still paused between pushes.
- Repeat for a third dot if you want more layers.
- Finish by pulling straight through all the dots to the edge of the cup.
The pause between pushes is what keeps each dot distinct. Skip the pause and the layers merge into one shapeless heart.
Rosetta
- Pour the base until roughly 60% full.
- Drop low and begin a small, steady side-to-side wiggle.
- Move the pitcher slowly backward toward the rim while continuing the wiggle.
- Keep wiggle width small and consistent. A wide, erratic wiggle produces uneven leaves.
- Finish with a confident straight pull-through the center.
Pro Tip: Isolate the pull-through by practicing it alone first. Pour a base, drop low, hold still for a beat, then just pull straight through with no wiggle at all. Nail that single motion before adding side-to-side movement.
Practice Drills That Build Muscle Memory Fast
Fifteen focused minutes beats an hour of scattered attempts. Structure matters more than volume here.
Try this three-part session:
- Five minutes steaming only, chasing the wet-paint texture and the tearing sound.
- Five minutes of ghost pours using water with a single drop of dish soap in the pitcher, which mimics milk texture without wasting a drop of dairy.
- Five minutes repeating one single pattern, not switching between all three.
For visibility during dry runs, put a splash of soy sauce or dark syrup in your practice cup. It stands in for crema so you can actually see contrast without pulling a real shot every time.
Repetition of one movement for 10 to 15 minutes teaches your hands faster than jumping between hearts, tulips, and rosettas in the same session. Beginners following a focused daily routine often produce their first recognizable heart within days to a couple of weeks. Adira Coffee’s step-by-step home barista tutorial walks through this same drill structure in more detail.
Common Latte Art Problems and Quick Fixes
Most pours fail for one of four reasons, and each one has a fast fix.
- Big bubbles on top: you aerated too long during the stretch phase. Cut your stretch time by a second or two next round, and tap and swirl to pop what’s already there.
- Flat, watery foam: you skipped or rushed the stretch. Start over if the milk hasn’t been heated past 100°F yet.
- No white contrast at all: you poured too high for too long during the art phase, or your crema was already thin or stale.
- Curdled plant milk: the temperature climbed too far past 150°F. Non-dairy proteins break down faster than dairy, so pull the pitcher off the steam wand sooner.
If your machine simply can’t hold steam pressure, no technique fixes that. Check whether foam quality changes across multiple attempts. Consistent failure points to the equipment; inconsistent failure points to your steaming rhythm.
Why Bean Quality and Crema Shape Your Canvas
Crema is your canvas. Thin, faded crema from stale or under-extracted coffee gives white microfoam nothing to contrast against, no matter how perfect your pour is. Pour within about 10 seconds of pulling the shot, while the crema is still fresh and structurally intact.
A double shot into an 8 to 12 oz cup gives you enough surface area to actually draw a shape without drowning the crema. This is where fresh, small-batch roasting matters. Beans roasted weeks ago and sitting on a supermarket shelf produce weaker, less stable crema than beans roasted days before shipping.
Fresh crema isn’t a nice detail. It’s the physical surface your entire pattern depends on, and it disappears fast once beans go stale.
Adira Coffee roasts single-origin lots from Colombia, Ethiopia, Costa Rica, Mexico, and Sumatra in small batches, shipped within days of roasting. Beyond espresso and drip beans, the catalog includes:
- Instant Coffee with Mushrooms for quick brewing without a machine
- Cold Brew for a smoother, low-acid option
- Mushroom Coffee (Medium Roast) for a functional, everyday roast
Coffee Art How To Really Means: Fewer Variables, More Reps
Most tutorials overload beginners with pitcher brands, wand angles down to the degree, and gear that costs more than a month of specialty coffee. That’s backward. The research on this consistently points to three variables that actually matter: milk temperature, pour height, and repetition of a single motion.
What’s overrated is chasing the “perfect” latte-art pitcher before you’ve steamed a hundred pitchers of milk. A $12 stainless pitcher and a $6 bag of whole milk will teach you more in a week than a $60 pitcher will in a month if you’re not drilling the stretch-then-vortex sequence correctly.
What the average home barista should prioritize first isn’t the pour at all. It’s crema. You can execute a flawless two-phase pour and still get a muddy, contrast-free cup if your espresso is weak or your beans are stale. Fix your coffee before you fix your wiggle. The pattern is the easy part once the canvas is right.
Get Fresher Beans, Better Crema, Sharper Art
Every rosetta and tulip in this guide depends on one thing you can’t fix with technique: fresh, well-extracted crema. That’s where most home latte art actually falls apart, not in the wrist movement, but in beans that sat on a shelf too long before hitting the grinder.

Adira Coffee roasts single-origin lots from Colombia, Ethiopia, Costa Rica, Mexico, and Sumatra in small batches and ships within days of roasting, so the crema you’re pouring onto is still doing what fresh crema does. A subscription saves you 10% and includes free US shipping over $35, which matters when you’re going through beans faster because you’re finally practicing every morning. Pick a single-origin bag suited to espresso, dial it in with your machine, and pull your next shot within days of it leaving the roaster instead of weeks.
Frequently Asked Questions
How long does it take to learn basic latte art at home? Most beginners following a focused daily routine produce a recognizable heart within days to a couple of weeks. Tulips and rosettas usually take longer since they require timing and wiggle control on top of the base pour.
Do I need an expensive espresso machine to practice coffee art? No. You need a machine or brewing method that produces real crema and a steam wand or milk frother capable of creating a vortex. Entry-level machines with steam wands work fine for learning fundamentals.
Why does my latte art always come out as a blob with no shape? This usually means your milk texture is off, either too thick from over-steaming or too thin from under-steaming, or your pour height stayed too high during the art phase. Drop closer to the surface and increase flow speed.
Can I practice latte art without wasting milk and espresso? Yes. Use water with a drop of dish soap in your pitcher to practice pouring, and a small pour of soy sauce or dark syrup in your cup to simulate crema contrast while you build motor memory.
What milk works best for latte art if I don’t drink dairy? Barista-style oat milk is the most consistent non-dairy option since it’s formulated to hold structure under steam heat. Regular plant milks from the standard aisle tend to split or foam unevenly.
Sources
- How to Make Latte Art, Food & Wine
- Latte Art Fundamentals — Coffee Guide — BrewFYI
- Milk Steaming & Latte Art for Beginners — Espresso Atlas
- Beginner’s Guide to Latte Art: Heart, Tulip & Rosetta (2026) — Brewed Barista