
TL;DR:
- Most small batch roasting issues stem from losing control before roasting rather than during the process itself. Optimizing workspace layout, workflow sequencing, and post-roast handling is essential for consistent, high-quality coffee. Implementing technology like roasting software and proper scheduling enhances precision and reproducibility at this scale.
Most roasters who struggle with consistency aren’t making mistakes during the roast itself — they’re losing control before the beans even hit the drum. A well-designed small batch roasting workflow is the difference between coffee that tastes like what you intended and coffee that tastes like what happened. This guide walks you through workspace setup, step-by-step execution, cooling, technology, and the pitfalls that quietly undermine even experienced roasters. If you roast anywhere from 1 to 5 kilograms at a time, this is built for you.
Table of Contents
- Understanding your small batch roasting workflow needs and workspace setup
- Step-by-step workflow: green bean handling to roasting
- Efficient cooling, blending, and post-roast handling tips
- Leveraging technology and software to refine your roasting workflow
- Common workflow pitfalls and advanced tips for small batch roasters
- Rethinking the small batch roasting workflow: insights from experience
- Explore Adira Coffee solutions to elevate your roasting workflow
- Frequently asked questions
Key Takeaways
| Point | Details |
|---|---|
| Streamline workspace | Efficient small batch roasting requires organizing a compact, well-planned workspace to optimize flow and quality. |
| Follow sequential workflow | Progress steadily from green bean intake through roasting, cooling, and packaging to avoid bottlenecks. |
| Cool beans fast | Rapid cooling within 2-4 minutes is essential to stop roasting and preserve flavor. |
| Use tech tools | Modern roasting software empowers small roasters with precision tracking and batch consistency. |
| Batch strategically | Roasting similar profiles consecutively minimizes equipment changes and preserves energy efficiency. |
Understanding your small batch roasting workflow needs and workspace setup
Before touching a green bean, you need a clear picture of what your operation actually demands. Small batch roasting benefits only materialize when your physical space and equipment match your production goals. A disorganized workspace forces constant improvisation, and improvisation is the enemy of repeatability.
Start by answering three questions: How many batches do you run per week? What’s your target output in kilograms? And how much floor space can you realistically dedicate to roasting, cooling, and storage? These numbers drive every decision that follows.
Key workspace elements to plan around:
- Roaster placement: Position your roaster near ventilation but away from foot traffic paths. A dedicated zone prevents cross-contamination and reduces distraction during critical roast phases.
- Green bean storage: Green coffee needs stable conditions, ideally 60 to 70 degrees Fahrenheit with 50 to 60 percent relative humidity. Use grain-pro bags or sealed containers on shelves away from exterior walls.
- Roasted bean holding: Keep roasted coffee in a staging area separate from green storage to avoid moisture migration and odor transfer.
- Cooling station: Place your cooling tray or colander within arm’s reach of the roaster. Every second of delay after the drop costs you flavor clarity.
When it comes to small batch roasting basics, equipment choice matters as much as layout. Compact roasters have come a long way. Compact IMF roasters achieve roasting times 30% shorter for 25% larger batches compared to traditional drum roasters, which means more output per hour without sacrificing the control that small batch work demands.
| Workspace element | Recommended setup | Why it matters |
|---|---|---|
| Green bean storage | Sealed bags, 60-70°F, 50-60% RH | Preserves cell structure and prevents premature aging |
| Roaster zone | Near ventilation, isolated traffic | Reduces distraction and heat buildup |
| Cooling station | Within 3 feet of roaster | Cuts transfer time and stops cooking immediately |
| Packaging area | Downstream from cooling | Logical flow prevents bottlenecks |
Pro Tip: Tape down a physical floor plan before moving any equipment. A 10-minute sketch saves hours of rearranging and helps you spot workflow dead-ends before they become habits.
Step-by-step workflow: green bean handling to roasting
With your workspace organized, let’s walk through the roasting workflow in detail. The goal here is sequential, intentional movement — no backtracking, no guesswork.
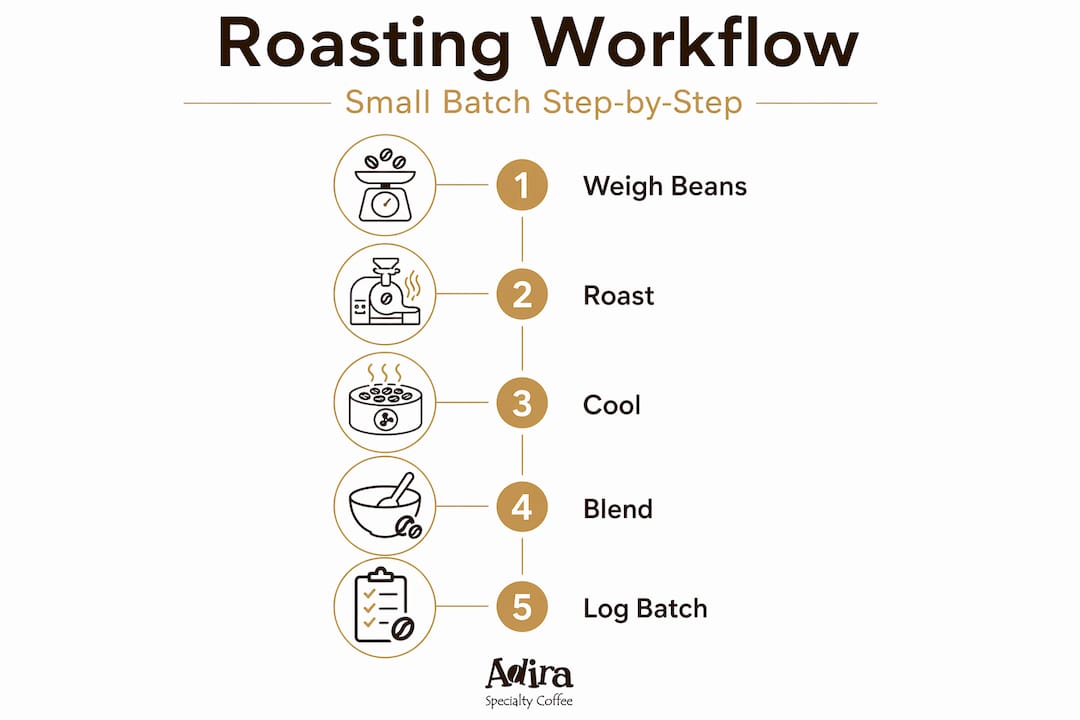
As a principle, workflow should move sequentially: green storage, roasting, cooling, storage, packaging, and shipping. Any deviation from this chain creates a bottleneck or a quality gap.
Step-by-step small batch coffee process:
- Intake and inspection: When green beans arrive, weigh them immediately and log the lot, farm, and moisture reading if you have a moisture meter. Beans above 12% moisture need extended conditioning time before roasting.
- Pre-roast cleaning: Sort out any visibly defective beans (black, sour, or insect-damaged) before loading. Even a few bad beans in a small batch can skew your cup profile noticeably.
- Preheat your roaster: Allow full preheat to your target charge temperature before loading beans. Rushing this step causes uneven heat distribution in the first two minutes of the roast.
- Charge the roaster: Load your measured batch size consistently. Varying charge weight between batches is one of the most common causes of profile drift.
- Monitor rate of rise (RoR): RoR measures how quickly bean temperature is climbing per minute. A declining RoR that flatlines before first crack often produces baked, flat-tasting coffee. Keep it positive and controlled.
- Use semi-automatic settings: Many compact roasters designed for the small scale roasting process now offer semi-automatic modes that hold gas pressure and airflow at preset levels. Use them. Your hands stay free for observation and logging.
- Call the drop: Drop the beans at your target end temperature based on your logged profile, not by color or smell alone. Both are useful secondary cues, never the primary trigger.
For those exploring a home roasting guide approach, the same principles apply with smaller equipment. The coffee roasting workflow steps are sequential regardless of scale.
| Roast phase | Key action | Target indicator |
|---|---|---|
| Charge | Load consistent weight | ±1% of target batch weight |
| Drying phase | Maintain steady heat | Bean color turns from green to yellow |
| First crack | Reduce heat input slightly | Audible popping, rapid RoR |
| Development | Hold target RoR | 20 to 25% of total roast time |
| Drop | Transfer immediately | Target end temperature ±2°F |
Pro Tip: Log every batch by hand or software before you think you need to. Roasters who start tracking after a quality problem spend three times as long diagnosing it.
Efficient cooling, blending, and post-roast handling tips
After roasting, efficient cooling and blending are critical to maintaining quality. The roast doesn’t end when the beans leave the drum. They keep cooking.

Cooling must occur within 2 to 4 minutes using a colander and fan to halt cooking, since beans retain heat post-roast. For small batches, a perforated cooling tray with a box fan underneath is both affordable and effective. Spread beans in a single layer and agitate them continuously for even airflow.
Post-roast handling best practices:
- Transfer beans to your cooling station within 15 seconds of the drop. Any delay adds unintended development.
- Use forced-air cooling rather than passive cooling. Passive cooling in a bowl or on a flat surface adds 3 to 5 minutes of residual heat, which can muddy delicate floral or fruit notes.
- Once cooled, rest your beans. Light to medium roasts generally benefit from 12 to 24 hours of degassing before cupping. Dark roasts can be evaluated sooner.
- When blending multiple batches, roast each component to its ideal profile separately, then blend after cooling. Never roast a blend together unless it’s been specifically profiled as one.
“The moment beans hit the cooling tray is when your roast profile either holds or unravels. Fast cooling locks in your work. Slow cooling rewrites it.”
For detailed roast cooling tips, the principle is simple: speed is quality. Every extra minute of residual heat is a minute of uncontrolled development you didn’t intend.
Leveraging technology and software to refine your roasting workflow
Embracing technology further refines your roasting process and consistency. Manual note-taking works, but it creates friction and human error at exactly the moments when your attention should be on the drum.
Cropster software enables logging profiles, monitoring live data, tracking weight loss, and replicating batches, effectively making professional-grade data analysis accessible to small roasters who previously only had paper logs.
What roasting software does for your workflow:
- Captures bean temperature, RoR, inlet temperature, and airflow in real time without manual entry
- Flags deviations from your saved profile so you can adjust before flavor is affected
- Tracks batch-to-batch weight loss, which is a direct indicator of roast development and moisture loss
- Stores a searchable history of every batch, making troubleshooting fast and evidence-based
For those weighing their options, here’s an honest comparison between manual and software-supported workflows:
| Workflow element | Manual tracking | Software-supported |
|---|---|---|
| Profile replication | Depends on note quality | Consistent, deviation-alerted |
| Roast history access | Paper log, limited search | Searchable database |
| Weight loss tracking | Requires separate scale logging | Automated per batch |
| Error detection | After the fact | During the roast |
| Setup cost | Near zero | Subscription or one-time fee |
The case for roasting software benefits becomes clear when you’re running 10 or more batches a week and need to reproduce a customer-favorite profile six months later. Memory and handwriting don’t scale. Logged data does.
Pro Tip: Even if you’re not ready to commit to full roasting software, start by photographing your paper log sheets and filing them by date. It’s a low-tech bridge that prevents the most common loss: notes that disappear.
Common workflow pitfalls and advanced tips for small batch roasters
Understanding common mistakes helps you refine and perfect your workflow. Most inefficiencies in a small batch roasting workflow are not roasting errors — they’re scheduling and sequencing errors.
Batch similar profiles sequentially to minimize roaster changeover time and energy use, roasting lights before darks to avoid temperature swings. Going from a light roast to a dark and back again forces your roaster to cycle through wide temperature ranges, which wastes energy and stresses the drum.
Common pitfalls and how to fix them:
- Inconsistent charge weight: Weigh every batch to the gram. A 50-gram variance in a 1-kilogram batch is a 5% difference that will show up in your cup.
- Ignoring environmental variables: Ambient temperature and humidity affect roast behavior. A profile that works in January may run faster in August. Log room conditions with every batch.
- Skipping the preheat: A cold roaster produces inconsistent first-crack timing and uneven heat distribution in the drum. Always preheat fully.
- Cooling too slowly: Covered in the previous section, but worth repeating because it’s the most common mistake even experienced roasters make when distracted.
- Mixing roast levels in blends without post-roast profiling: Light and dark beans roasted together will never both be at their best. Roast separately, blend after.
“The roaster who batches by convenience rather than by profile logic is always fighting their own schedule.”
For specific avoiding roasting mistakes strategies, the pattern is consistent: most errors are upstream of the roast itself, embedded in planning and sequencing decisions made hours before the drum heats up.
Pro Tip: Build a weekly roast schedule the day before, grouping batches by profile level from lightest to darkest. You’ll cut your total roast session time by 15 to 20 percent with no changes to the roast itself.
Rethinking the small batch roasting workflow: insights from experience
Here’s what most guides won’t tell you: the biggest efficiency gains in small batch roasting rarely come from the roast itself. They come from the 30 minutes before and after it.
Roasters who obsess over in-roast variables while neglecting batch sequencing, workspace layout, and post-roast handling end up with technically proficient individual batches and chaotic overall operations. The small batch roasting insights that actually move the needle are about systems, not technique.
There’s also a persistent myth that compact or small-scale equipment limits quality. It doesn’t. What limits quality is trying to run a large-roastery workflow through small-roastery equipment. The patterns don’t transfer. Forcing large batch logic — high-volume scheduling, aggressive temperature ramps, minimal rest time between batches — into a 3-kilogram roaster creates heat stress on the machine and inconsistency in the cup.
The craft roast workflow that actually works at small scale is slower in rhythm, more deliberate in sequencing, and more dependent on real-time observation than large-scale automation allows. That’s not a limitation. It’s the advantage. Small batch roasting gives you the feedback loop and the control that production roasters spend fortunes trying to replicate.
Invest in your workflow design early. A poorly laid-out workspace or an underdeveloped batch scheduling system will cost you more in wasted green coffee and inconsistent outputs than any equipment upgrade ever will. Get the process right before you scale the volume.
Explore Adira Coffee solutions to elevate your roasting workflow
Ready to enhance your roasting journey? Discover how Adira Coffee can support you.
If you’re serious about your small batch roasting workflow, the quality of your green beans sets the ceiling for everything else. Adira Coffee sources specialty coffee beans from around 50 farms across Colombia, Ethiopia, Costa Rica, Guatemala, Brazil, and Sumatra — all ethically sourced and roasted fresh to order.
Not sure which origins suit the roast profiles you’re developing? Take the coffee flavor psych test to identify the flavor directions that match your palate and roasting goals. If you want a starting point for a new profile, Costa Rica coffee from Adira is a standout choice — its clean acidity and balanced sweetness respond beautifully to a range of roast levels, making it ideal for workflow experimentation and profile building.
Frequently asked questions
What is the ideal batch size for small batch roasting?
Small batch sizes typically range from 1 to 5 kilograms, offering enough control and feedback to maintain roasting consistency. The ideal size depends on your specific roaster capacity and weekly demand.
How quickly should coffee beans be cooled after roasting?
Beans should be cooled within 2 to 4 minutes using a fan or colander to stop the roasting process and lock in intended flavor development.
Can roasting software improve small batch roasting consistency?
Yes. Tools like Cropster let small roasters log and replicate batches with precision, replacing inconsistent manual notes with searchable, actionable data.
What are common mistakes in small batch roasting workflow to avoid?
The most frequent errors include poor batch sequencing, slow post-roast cooling, and inconsistent charge weights. Batching similar profiles consecutively alone can eliminate a significant share of temperature-related inconsistencies.