
Most coffee lovers believe roasting is simply heating green beans until they turn brown. In reality, roasting is a precise orchestration of chemical reactions, temperature control, and timing that transforms bland seeds into aromatic coffee. Understanding the roasting process empowers you to choose beans that match your brewing style, recognize quality roasting, and even experiment with home roasting. This guide breaks down each roasting phase, reveals how roast levels shape flavor, and equips you with practical techniques to elevate your coffee experience from bean selection to cup.
Table of Contents
- Key takeaways
- Phases of the coffee roasting process explained
- Techniques and tips for roasting coffee at home
- Understanding roast levels and their impact on flavor
- Explore premium coffee beans and roasting supplies
- Frequently asked questions about the coffee roasting process
Key Takeaways
| Point | Details |
|---|---|
| Roast phases | Roasting unfolds through drying, first crack, development, second crack, and cooling, with each phase driving specific flavor and texture changes. |
| Light roast end | Light roasts end shortly after first crack to preserve acidity and origin flavors. |
| Development time | Development time balances acidity, sweetness, and bitterness to shape the final cup. |
| Cooling importance | Cooling quickly after roasting stops further reactions and preserves the intended roast level. |
| Home roasting control | Home roasting methods vary but all require controlling time and temperature. |
Phases of the coffee roasting process explained
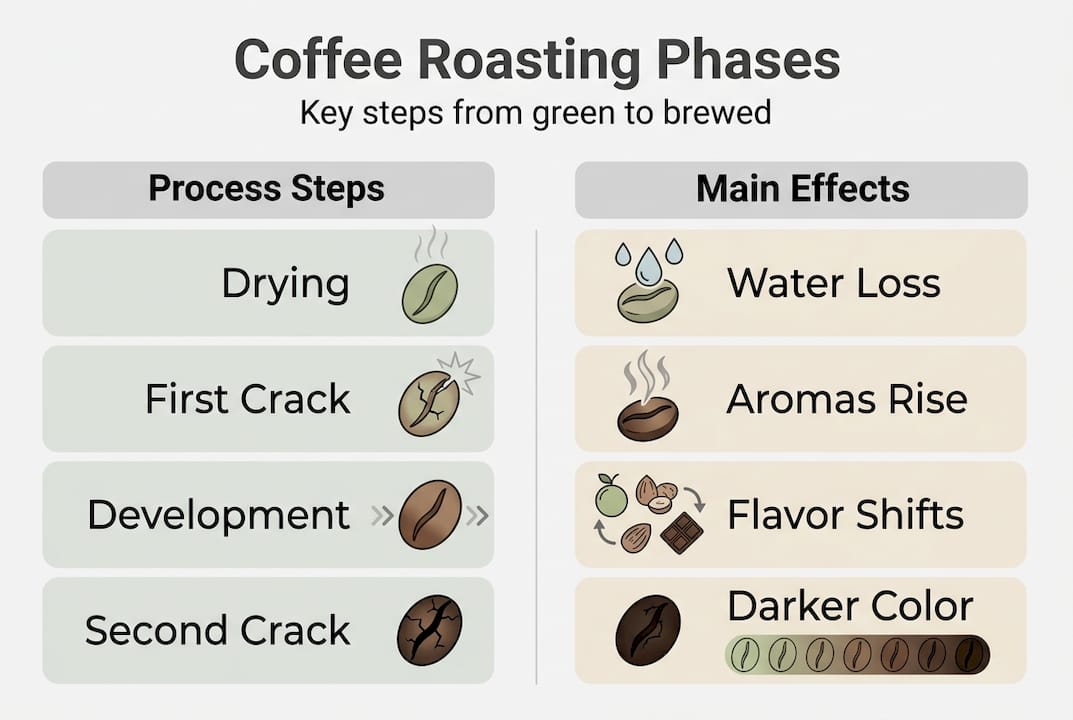
Roasting coffee beans progresses through distinct phases, each defined by temperature milestones and physical transformations. Recognizing these stages helps you understand how roasters craft flavor profiles and why timing matters so much.
The drying phase begins immediately when green beans enter the roaster. During the first few minutes, moisture evaporates from the beans as internal temperature climbs toward 160°C. Beans turn from green to yellow and emit a grassy, hay-like aroma. This phase sets the foundation for even roasting because beans with inconsistent moisture content will roast unevenly.
Around 196 to 205°C, you hear a sharp cracking sound as beans undergo first crack, an audible expansion caused by water vapor and carbon dioxide escaping through the bean structure. This moment marks the transition from inedible green seeds to drinkable coffee. Light roasts typically end shortly after first crack begins, capturing bright acidity and delicate origin characteristics. The beans are now lighter in density, slightly larger in volume, and have developed their first layer of complex flavors.
The development phase follows first crack and represents the most critical window for flavor refinement. During this stage, Maillard reactions accelerate, creating hundreds of aromatic compounds while caramelization converts sugars into sweetness and body. Roasters manipulate development time to balance acidity, sweetness, and bitterness. A short development creates vibrant, tea-like coffees with pronounced acidity. Extending development builds body, enhances sweetness, and softens acidity. Most medium roasts spend one to three minutes in this phase, allowing flavors to integrate while preserving origin character. Understanding your coffee roast profile helps you predict how development time shapes the final cup.
At approximately 225°C and beyond, second crack occurs, signaling entry into dark roast territory. This crack sounds sharper and faster than first crack as bean structure breaks down further. Oils migrate to the surface, creating a glossy appearance, and roast flavors begin to dominate origin characteristics. Dark roasts develop smoky, bittersweet notes with reduced acidity and heavier body. Pushing past second crack risks carbonization, where beans taste ashy and burnt.
Pro Tip: Listen carefully during roasting for the distinct sounds of first and second crack. These auditory cues are more reliable than visual assessment alone, especially when roasting small batches where color changes can be subtle.
Roasting stages breakdown
- Drying phase (up to 160°C): Moisture evaporates, beans turn yellow, grassy aroma emerges, duration typically 4 to 8 minutes
- First crack (196 to 205°C): Audible popping, beans expand, light roast endpoint, acidity peaks, origin flavors shine
- Development phase (205 to 220°C): Maillard reactions intensify, sweetness develops, body builds, medium roast range, flavor balance achieved
- Second crack (225°C+): Sharp cracking, oils surface, dark roast begins, roast character dominates, bitterness increases
- Cooling phase: Rapid temperature drop stops reactions, preserves intended roast level, prevents over-roasting
Each phase builds on the previous one, creating a cascade of chemical and physical changes that define your coffee’s final flavor. Skipping or rushing any stage produces unbalanced results, which is why professional roasters invest in precise equipment and extensive training.
Techniques and tips for roasting coffee at home
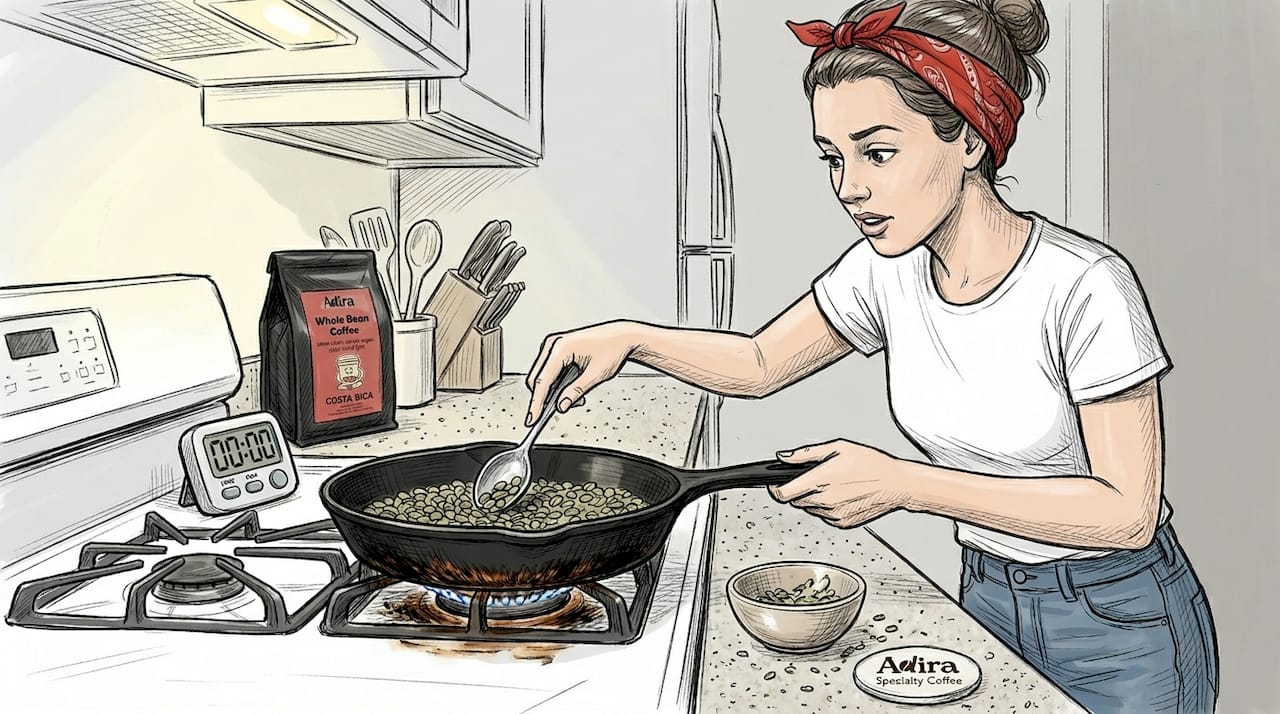
Home roasting opens creative possibilities for coffee enthusiasts who want fresh beans and control over roast level. While commercial roasters use sophisticated drum or fluid bed machines, home methods range from simple to moderately technical.
Common home roasting approaches include skillet roasting, popcorn popper roasting, oven roasting, and dedicated air roasters. Skillet roasting takes 10 to 15 minutes over medium-high heat with constant stirring to prevent scorching. Popcorn poppers provide better airflow and more even roasting in 5 to 8 minutes but require ventilation due to smoke production. Oven roasting spreads beans on a perforated pan at 230°C for 12 to 18 minutes, though heat distribution can be uneven. Air roasters designed for coffee offer the most consistency, completing roasts in 8 to 12 minutes with automated temperature control.
Batch size significantly impacts roasting success. Small batches of 100 to 200 grams roast more evenly than larger quantities because heat penetrates uniformly and you can monitor color changes across all beans. Overcrowding prevents proper airflow, creating a mix of under-roasted and scorched beans in the same batch. Start small until you develop a feel for timing and temperature.
Cooling immediately after reaching your target roast level is non-negotiable. Beans retain heat and continue roasting internally even after removal from the heat source. Transfer beans to a metal colander or cooling tray and stir vigorously while blowing air across them with a fan. Aim to drop bean temperature below 100°C within four to five minutes to halt chemical reactions and lock in your intended roast profile. Skipping this step results in over-roasted coffee with muted flavors.
Pro Tip: Monitor both color and aroma during roasting rather than relying solely on time. Ambient temperature, bean density, and moisture content affect roasting speed, so sensory cues provide more accurate guidance than a timer alone.
After roasting, beans need rest time for degassing. Freshly roasted coffee releases carbon dioxide for several days, which can create harsh, underdeveloped flavors if brewed immediately. Rest light roasts for 3 to 7 days and darker roasts for 5 to 14 days before grinding and brewing. Store beans in an airtight container away from light and heat during this period.
Essential home roasting practices
- Choose fresh green beans from reputable suppliers with recent crop dates for best results
- Roast outdoors or in well-ventilated areas because smoke and chaff production can be substantial
- Keep detailed notes on bean origin, batch size, roast time, and crack timing to replicate successful roasts
- Invest in a kitchen thermometer or infrared temperature gun to track bean temperature accurately
- Experiment with different development times after first crack to discover your preferred flavor balance
- Clean your roasting equipment thoroughly after each session to prevent rancid oil buildup
Home roasting rewards patience and experimentation. Your first few batches may produce inconsistent results, but each roast teaches you how beans respond to heat and timing. Consulting brewing guides helps you optimize extraction methods for your home-roasted coffee.
Understanding roast levels and their impact on flavor
Roast level profoundly influences flavor, aroma, body, and acidity in your cup. Choosing the right roast level for your beans and brewing method maximizes coffee quality and enjoyment.
Roast level comparison
| Roast Level | Temperature Range | Duration | Flavor Profile | Weight Loss | Best For |
|---|---|---|---|---|---|
| Light | 196-205°C | 8-11 min | Bright acidity, floral notes, tea-like body, origin flavors dominant | 15-17% | Pour-over, Chemex, light-bodied preferences |
| Medium | 210-220°C | 11-14 min | Balanced acidity and sweetness, caramel notes, medium body, origin and roast blend | 18-20% | Drip coffee, Aeropress, versatile brewing |
| Dark | 225-235°C | 14-17 min | Low acidity, chocolate and smoky notes, full body, roast flavors dominant | 22-25% | Espresso, French press, milk-based drinks |
Lighter roasts preserve the bean’s inherent characteristics, showcasing terroir, processing method, and varietal distinctions. Ethiopian coffees roasted light reveal blueberry and jasmine notes, while Colombian beans display citrus brightness and nutty sweetness. Acidity remains vibrant, body stays lighter, and caffeine content is marginally higher because shorter roasting preserves more of the original compound structure.
Medium roasts strike a balance between origin expression and roast development. Sweetness increases as caramelization progresses, acidity mellows slightly, and body builds without overwhelming delicate flavors. This roast level suits the widest range of brewing methods and appeals to coffee drinkers who want complexity without extreme brightness or bitterness. Exploring a medium roast guide reveals why this level dominates specialty coffee.
Dark roasts emphasize body, reduce acidity, and introduce roast-derived flavors like dark chocolate, toasted nuts, and smoke. Origin characteristics recede as Maillard products and caramelization byproducts dominate the flavor profile. Weight loss during roasting ranges from 15 to 25 percent as moisture evaporates and organic compounds volatilize, with darker roasts losing more mass. Density decreases correspondingly, making dark roasted beans larger and more brittle than their light roasted counterparts.
Flavor characteristics by roast level
- Light roasts: Pronounced acidity, floral and fruity aromatics, delicate body, complex origin flavors, highest perceived caffeine
- Medium-light roasts: Moderate acidity, balanced sweetness, developing body, origin flavors with subtle roast notes
- Medium roasts: Balanced acidity and sweetness, caramel and nutty notes, medium body, versatile flavor profile
- Medium-dark roasts: Reduced acidity, chocolate and spice notes, fuller body, roast flavors emerging
- Dark roasts: Minimal acidity, bittersweet and smoky flavors, heavy body, roast character dominant, lowest perceived caffeine
No single roast level reigns supreme. Your ideal roast depends on bean origin, processing method, and brewing technique. Single-origin coffees with distinctive flavor profiles often shine at light to medium roasts, while blends designed for espresso typically perform better at medium-dark to dark levels. Choosing coffee beans with roast level in mind ensures your brewing method extracts the best possible flavors.
Brewing method compatibility matters too. Pour-over and drip methods highlight the clarity and brightness of light roasts, while espresso machines extract rich crema and body from medium-dark to dark roasts. French press brewing suits medium to dark roasts because immersion extraction emphasizes body and reduces perceived acidity. Experimenting with different roast levels in your preferred brewing method reveals how roasting shapes the sensory experience.
Explore premium coffee beans and roasting supplies
Now that you understand how roasting transforms green beans into flavorful coffee, applying this knowledge starts with sourcing quality beans suited to your preferred roast level and brewing style. Adira Coffee offers premium coffee beans from renowned origins including Ethiopia, Colombia, Guatemala, and Sumatra, each roasted in small batches to peak flavor.
Whether you prefer bright, fruity light roasts or rich, chocolatey dark roasts, selecting beans roasted by experts who understand development time and flavor balance ensures every cup delivers the complexity you seek. Our coffee brewing guides provide detailed instructions for extracting the best flavors from your chosen roast level, helping you translate roasting knowledge into brewing excellence. Explore the full range of offerings at Adira Coffee to support your journey from understanding roasting to enjoying exceptional coffee at home.
Frequently asked questions about the coffee roasting process
What is the ideal roast duration for home roasting?
Ideal roast duration varies by method and desired roast level, typically ranging from 8 to 17 minutes. Light roasts finish around 8 to 11 minutes, medium roasts take 11 to 14 minutes, and dark roasts extend to 14 to 17 minutes. Focus on auditory and visual cues rather than strict time limits because bean density and moisture content affect roasting speed.
How do I know when to stop roasting my coffee beans?
Stop roasting when beans reach your target color and you hear the appropriate crack. Light roasts end shortly after first crack begins, medium roasts finish midway through development, and dark roasts stop during or after second crack. Immediately cool beans to prevent carryover roasting from residual heat.
Why is cooling coffee beans quickly after roasting important?
Quick cooling halts chemical reactions that continue even after removing beans from heat. Without rapid cooling, beans over-roast internally, developing bitter flavors and losing intended brightness or sweetness. Aim to drop temperature below 100°C within four to five minutes using airflow and stirring.
Can I roast any coffee bean at home?
You can roast most coffee beans at home, but results depend on bean quality, freshness, and moisture content. Choose green beans from reputable suppliers with recent crop dates and consistent processing. Avoid defective or aged beans that produce off-flavors regardless of roasting skill.
How long should roasted beans rest before brewing?
Roasted beans should rest 3 to 14 days depending on roast level. Light roasts peak around 3 to 7 days post-roast, while darker roasts benefit from 5 to 14 days of degassing. Brewing too soon produces harsh, underdeveloped flavors as trapped carbon dioxide interferes with extraction. Understanding small batch roasting principles helps you time consumption for peak freshness.
Does roast level affect caffeine content?
Roast level has minimal impact on caffeine content by weight, but darker roasts are less dense, so measuring by volume yields slightly less caffeine. The difference is negligible in practical terms. Brew strength and coffee-to-water ratio influence caffeine concentration far more than roast level.